Monday, December 23, 2019

Starry Night Christmas Cards for Scrap Shotz

Christmas is almost here so it's time to finish up those Christmas cards! The December kit is amazing! It is full of Kaisercraft - Starry Night products. So many fun embellishments from gold foil ephemera to twine to wood veneer. Let's take a look. I made 10 cards in the A2 size.

Card #1
I used a sketch from the October 2019 Page Maps collection. The Curio embellishments were the perfect fit. The papers are from the 6x6 paper pad. The paper pad has a bunch of punch out phrases and trimmings which came in very handy.

Card #2
I used a square punch to make the background from the 6x6 paper pad. The wood veneers fit into each sqaure and some gold paint topped them off. A piece of twine added a focal point.
Card #3
Twine, ephemera and some 6x6 papers.

Card #4
I fussy cut some gold foil flowers from a 6x6 paper. I used some ephemera to top it off. Those corner  pieces are actually the punch outs from one of the embellishments. I used some gold thread from my stash as well.
Card #5
Here I layered a bunch of 6x6 papers. The gold tag is so pretty and topped off with some twine and gold painted wood veneer. 
Card #6
Some more 6x6 papers, gold foil ephemera and twine. The gold dots are from the Thickers letter pack.
Card #7
I used some Stonehenge Bazzill cardstock and 6x6 papers. Wood veneer and gold thread finish it off. 
Card #8
This card uses some 6x6 papers and ephemera.
Card #9
This card uses Kraft Bazzill cardstock layered with 6x6 papers, ephemera and twine.

Card #10
My daughter really wanted to help with the cards so she helped with this one. She chose the papers. I suggested using a punch to back the tag in the center.

Thanks for taking a look! Have a wonderful holiday season!

Thursday, December 12, 2019

No More Tape Layout for Sketches In Thyme

Here is my interpretation of the sketch this week over at Sketches In Thyme. I used the Carta Bella Christmas Delivery Collection and my Silhouette Cameo to cut the title and rikrak.
Here is the sketch:
No photo description available.
Thanks for stopping by! I hope you get a chance to play along for a wonderful Heidi Swapp paper pad.

Tuesday, December 10, 2019

Snow Much Fun for Scrap Shotz

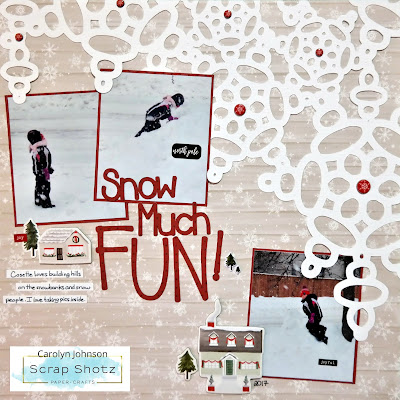
Hello! I'm back again to show you another Carta Bella Snow Much Fun layout. I decided to use this fun background paper with the hills since my picture is about sledding. I broke the page up into sections so things didn't get too busy.
I cut the snowflakes out with my Silhouette Cameo using the Fallen Snow cut file from Just Nick. I layered some of the snowflakes and added stickers to the center. I also put some liquid glass spots on them to make them sparkly. The snowflakes are attached with glue dots so the centers stay put and the rest of each snowflake can pop off the page. 
The banner is made from the ephemera pack and backed with some patterned paper. 
Lastly, I finished it off with some chipboard and stickers.
Thanks for taking a look at my layout! Be sure to check out the shop for this cute collection.

Wednesday, December 4, 2019

Snow Happy Layout for Scrap Shotz

Hello everyone! I'm here today with another layout using the Carta Bella Snow Much Fun Collection from Scrap Shotz. This time, I've used pictures from my daughter's 4th birthday party which had a Frozen theme. The teal colours in this collection matched the Elsa costumes the kids were wearing.
I was also inspired by the November sketch on the Creative Scrapbooker Magazine Facebook page. Here is the sketch:
No photo description available.
That's a lot of pictures! I tend to crop my pictures so they take up the entire 4 x 6 photo so I didn't have room for all 8 photos. I used 2 journaling cards instead.
I added some snowflake stamps from the Kaisercraft Let It Snow stamp set. Then I layered snowflake stickers on top.
I couldn't resist changing the 'let it snow' card to say 'let it go'.
These Nuvo Pearl Rectangles are so pretty I want to add them to everything. I held back and used them as a border.
I tried to keep the eye flowing diagonally from the top left corner to the bottom right corner. I also tried to make visual triangles by clustering snowflakes in groups of three.
The chipboard makes for a good title.
Thanks for taking a look at my layout. I hope you get a chance to check out these awesome products!

Monday, December 2, 2019

Carta Bella Snow Much Fun Kit from Scrap Shotz

Find those winter pictures because this kit is the perfect way to scrap those memories! Carta Bella has made the Snow Much Fun Collection with shades of teal to make your snowy photos pop. It also has some cute stickers and chipboard you won't want to pass up.

I made a layout inspired by one of the phrases in the kit: the snuggle is real. I thought of this picture of my daughter in her 'nest'. She piles blankets and pillows in her bed so sometimes I can't even see her in there.
I decided to build her a nest by cutting strips of paper and gluing them randomly. My kit also came with Nuvo Pearl Rectangles. They are so pretty I had to add them to the nest. I used Bazzill London Fog Cardstock from a previous kit to cut out tree branches to support the nest. In behind, I used clear gesso and smooshed some green and blue paint on top.

The title is made with chipboard and words from a cut apart card. The Thickers are from a previous kit. The tags are from the ephemera pack and the cute girl and bear with their blankets are from the sticker sheet in the paper pack.

I also had some birthdays to celebrate this week so I made some cards.
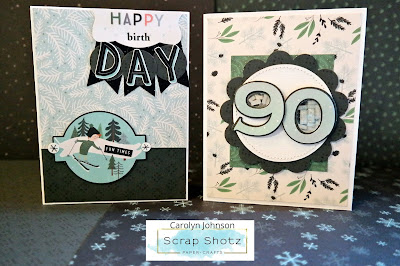
The first card is for a 90th birthday! I cut the number out on my Silhouette and placed it over a shaker pocket filled with the Nuvo Pearl Rectangles. I used a punch to cut out the scallop circle and did some stitching on my sewing machine.
The second card pieced together many elements from the kit. The sentiment in the picture didn't make sense so I covered it with one that did. I used a few pieces from the ephemera pack and some stickers from the paper pack.
That's all for now. I'll be back on Wednesday with all new inspiration. Thanks for stopping by! Have a great week!

Tuesday, November 12, 2019

My Crew Layout for Sketches In Thyme

It's time for my November Sketches In Thyme layout. This month I used the Vicki Boutin - Color Kaleidoscope line.
Here is the sketch:
No photo description available.
Thanks for stopping by! Hope you can play along for a chance at a great prize.

Wednesday, November 6, 2019

Carta Bella Christmas Market Cards for Scrap Shotz

Carolyn here today with some Christmas cards. The new Carta Bella Christmas Market Collection is perfect for card making. The puffy stickers are small enough for cards and there are cut apart cards in the paper kit. I also received some Kaisercraft stamps called "Let It Snow" and a Kaisercraft stencil called "Festive Foliage" which added those special touches to the cards.
The top card uses foam to pop the sentiment off the card. I cut the sentiment out of one of the papers. A die cut from the ephemera pack and some puffy stickers finish it off. The bottom cards layered papers from the collection kit and used some pop dots. All the cards are A2 size. 
The top card uses the Kaisercraft stamps for the sentiment and the trees. I used two different colours of ink and two different sized trees. To make the trees smaller, I held a scrap paper over the card so only the top part of the stamp touched the card. I like how it made the trees appear to be in the distance. I added a couple puffy stickers and the barn and sled stickers.
The bottom card is several layers of paper and a few stickers from the kit. The sentiment is from the Kaisercraft stamp set.
My last set of cards used the stencil and Kaisercraft stamps. The bottom two cards used modeling paste mixed with paint. I taped the stencil down so it didn't move. The top card uses paint. It was a little trickier to not have the paint run under the stencil.
Thanks for stopping by! Have a great day!

Friday, October 25, 2019

Four Carta Bella Christmas Market Layouts for Scrap Shotz

I'm back again with some Christmas memories to share. We had a huge snow storm in Winnipeg recently so it really wasn't a stretch to be scrapping Christmas layouts. I was so excited to receive the Carta Bella Christmas Market Collection. It is great for cards and layouts and coordinates with collections from previous years. I decided to start by making some long overdue layouts.

Layout #1 - Christmas Memories

I love how this layout turned out. All the tags are cut out from one of the 12 x 12 papers. At first I wanted the tags to all face outward but then the pictures along the bottom would've been upside down. I decided it was more important that they faced upward. The flowers are fussy cut from another paper in the collection. The final touches are pieces of chipboard and a ribbon from my stash.

Layout #2 - Official Christmas Cookie Taste Tester

I found this cut file in the Silhouette Store. I love big titles that have the font style and sizes already selected. I cut the title out of several different papers and glued it to a plain white paper. The edges I scuffed up and tore to add some more interest. The gingerbread man is cardstock from the June kit. I added some stickers from the Carta Bella kit and enamel dots around the page to finish it off.

Layout #3 - Tree Time

This layout came together one piece at a time. I had no vision beforehand. I chose two pictures that I liked and built the page around them. I liked the paper with the trees on it so I used it on the outside and put a less distracting paper in the middle to build the layout. I found another cut file in the Silhouette Store with the trees that had some snow on them. Decorating the trees was the best part. I used puffy stickers and enamel dots. I cut out some "snow" to match the trees and placed it under my title which I cut from a font I liked. Then I filled in the rest of the page with a variety of pieces from the ephemera pack.

Layout #4 - Snow Much Fun

Here is the sketch:
Image may contain: text
This layout came about because I used the October Creative Scrapbooker Magazine sketch as inspiration. The layout of the circles made me think of the cut file from Just Nick that looks like a frosted windowpane. I used a piece of white Bazzill cardstock from the June kit to cut out the shape. I added some chipboard snowflakes to the centers of the patterns. A variety of cardstock, puffy and chipboard stickers finished it off.

Thanks for stopping by! Have a great weekend!

Saturday, October 12, 2019

Unique Layout for Sketches In Thyme

I'm up on the Sketches In Thyme blog today with this baby layout. I used Cocoa Vanilla Bohemian Dream and Wild at Heart Collections. I used a 3D flower cut file in my Silhouette Cameo. Join us this week for a chance at a great prize!
Here is the sketch:
Image may contain: text
Thanks for stopping by! Have a great day!

Saturday, October 5, 2019

Be Sweet and Fabulous Layout for Scrap Shotz

I only had one paper left in my September kit from Scrap Shotz, so I had to use it.
The kit is full of Pinkfresh Studio - Just A Little Lovely. Those Studio Katia rainbow dots are really neat and glad I could use so many on this layout. I fussy cut some papers and layered them over the acetate flowers.
Thanks for stopping by! Have a great day!

Friday, September 27, 2019

Believe Layout for Scrap Shotz

Hello! I hope you had a chance to check out our Scrap Shotz blog hop! If not, go back one post and join in. There is a chance to win a $25 gift card to the store.

I used the September kit to make another layout. The kit is full of Pinkfresh Studio - Just a Little Lovely.
I grabbed a font I liked and wrote it out in my Silhouette Cameo software. I then drew a line down the side of the letters. I deleted the line where the letters touched my paper so it wouldn't cut. Now I have this cool effect that looks like the letters are coming out of the paper. I put some Bazzill cardstock behind it.

I put some white paper behind the smaller wreath so it would stand out. The rest is just embellishing.

I love this kit sooo much! I hope to post one more layout. Come back soon!

Wednesday, September 25, 2019

Scrap Shotz Blog Hop


Welcome to our Creative Team Blog Hop!
Keep scrolling to see my layout!

We are so thrilled to have you join us as we celebrate Scrap Shotz’s brand new look.

Not only do we have a new logo, we also have a new website. If you haven’t yet shopped the new site you can head over by clicking HERE.

The team is sharing projects inspired by the brand new Scrap Shotz logo:


Prizes

To celebrate our new look, Scrap Shotz is giving away a $25 gift certificate to 1 lucky winner! Please leave a comment on any of the blogs by October 2, 2019.

Every comment you make will earn you an entry so comment on all 6 blogs for 6 chances to win!

Blog Hop

Hop along to the Creative Team blogs to see how everyone was inspired by the new look.
Carolyn Fraser-Johnson ← you are here
Now for my layout!
I chose to use the September kit because everything about it makes me think of the new Scrap Shotz logo. The kit is full of Pinkfresh Studio - Just a Little Lovely. The borders on the cut apart tags and the watercolour effect on all the papers are just like the logo.
I stitched a border like the border on the new logo. Even the font on the tag is similar to the new logo.
Here are some close-ups.
 I love layering these embellishments.
 I layered stickers over the printed flowers to use more space and added some enamel dots. Those tiny alphas have been so handy to write subtitles.
A view of my sewing machine stitching and the distressing of the paper.

That's all for now! Make sure to leave a comment for a chance at a $25 Scrap Shotz gift card.
Then hop on over to Lorraine Melin's blog.
Have a great week!

Wednesday, September 18, 2019

Pinkfresh Studio Just a Little Lovely Layouts for Scrap Shotz

Hello! I'm back today with a whole lot of layouts using the September kit from Scrap Shotz. It is soooo pretty. The kit is mostly Pinkfresh Studio - Just a Little Lovely collection. It has beautiful acetate flowers, watercoloured papers and hand written puffy words. So awesome.

Layout #1 - Precious Moments
My first layout is about a very special member of my community. She wore the best outfits and I was lucky enough to get a picture of her and my daughter on a tropical themed day at church. Of course I loaded up on the flowers to go with their outfits.
The frame is a cut file from the Silhouette Store. I used the cardstock in the kit to cut and back it. The acetate flowers needed to pop so I backed them with white paper. I also was pretty impressed I could find ways to incorporate the phrase stickers into my journaling.

Layout #2 - Never Grow Up
I really wanted to colour these flowers. I used a rainbow strip at the bottom of the page and painted the flowers like the colour was coming up into the page. I tried to paint them lighter as I went up the page. I used some pop dots to pop up some flowers from the ephemera package. I love making titles with the handwritten words and the mini puffy alpha stickers. I had to restrain myself from painting this whole page!

Layout #3 - Ladder Ball
This layout was inspired by the September sketch on the Creative Scrapbooker Magazine's Facebook page. Here is the sketch:
The circles made sense to me with the theme of ladder ball. So I used all sorts of enamel dots, a few punched cardstock circles and some of the Studio Katia Rainbow Dots. This was really easy to make so I encourage you to give it a try! How unique are those tags with the wooden tops?

Layout #4 - Smile, Sparkle, Shine
My final layout is probably my favourite. Who can resist a flower wreath? The background paper did all the work. I just backed my photo and tag with cardstock and added some embellishments. The tag has puffy sticker flowers on it because the flowers on the card didn't have any colour. Now it blends better with the wreath. 

I hope you found some inspiration here today! I can't wait to see what people make with this kit. Be sure to check out the new and improved Scrap Shotz website. I'll be back on the 25th with another September kit layout as part of our team blog hop. Have a great week!